| T O P I C R E V I E W |
| Limited24 |
Posted - 10/09/2011 : 04:05:00
Hi
I start this project 2 weeks ago. There is my wip so far. I will update asap. Hope you will like it.


Two wite metal parts are original parts. I think it's not sharpen enough. So I redo those parts in copper.

Brakes are not sharpen enough, too. So I scratch built 4 brakes disks.

Paint the engine parts and gear box. This kit include clutch disk, I am so Surprised.

The Chassis hard work almost fix done.

This pin head looks so Orz...

Fix the pin head.

After I fixed this pin head. It looks better.


The photo shows what I do.

Some body let me put a coin into the photo. XD

Make some ants XD...

Add some scratch built parts on driving shift.

|
| 15 L A T E S T R E P L I E S (Newest First) |
| Limited24 |
Posted - 11/25/2011 : 03:14:22
Sorry to reply so late!
Hi pat175288
Thank you. I connect to the link you type. There is a "Made in Japan" forum. I am come from Taiwan, I think it is not very suitable to post my model on there...... Anyway, Thank you very much.
Hi PeterW
Little bricks are so cute. If I can find that, I woudl like to buy some. Of course your 335S is so awesome. I love it.
About the wheels, I change the Bosica wheels, the surface treatment is very good. It looks shine, so I didn't spray the wheels dull aluminum. That is my personal feeling.
About the wing of the roof, The true car is combine by riveted. I saw a small join line. Although that is a small join line, but I want to keep. Even that will be a visible join line on the model. |
| PeterW |
Posted - 11/17/2011 : 15:15:14
I just noticed something...the rear "wing" section of the roof [normally] should be molded into the body....I see a join line. Is that correct for this version? |
| pat175288 |
Posted - 11/17/2011 : 11:28:12
Semplicemente straordinario! Amazing work...
For all 1/43 masterpiece lovers check this out: italian forum with lots to see from Asian wizards!
http://amgmodels.mastertopforum.com/made-in-japan-vf35.html |
| PeterW |
Posted - 11/17/2011 : 11:25:27
Very nice display...but I can't help but think if you had done the wire wheels as a dull aluminum [as they were] it would display much better on that base.
That's my only advice on a superb build!
I just did a 335S and when I designed the base I found little bricks at my local shop. I think they are just too cool!
 |
| Limited24 |
Posted - 11/15/2011 : 06:56:49
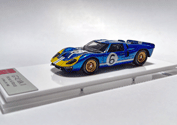
Finally, I finished the job! Any command welcome!


 |
| Limited24 |
Posted - 11/14/2011 : 20:51:26
I build a customized display. And....the customer asked me to sign my neme....
 |
| 360driver |
Posted - 11/11/2011 : 14:10:42
Wow! I sveral times saw a kit of the Feeling43 250LM and heard it should be very difficult to build, but now I understand why.......most parts have to be modified and even machined over.....You did an impressive job! and I am very envious since the 250 LM is one of my al time favorites! Looking very good!
|
| Limited24 |
Posted - 11/11/2011 : 08:40:34
Scratch built two reflectors, and fix lens.

It looks better then original.

The almost done chassis rear view.


The car shell almost done.

 |
| Limited24 |
Posted - 10/26/2011 : 03:33:40
Paint the body deep red and finish the decals job.

The car body after clear coat.

The rear engine cover after clear coat.
 |
| Limited24 |
Posted - 10/22/2011 : 22:09:49
After I wash car body parts, some parts get rusty = =". So I have to palish some parts.

The front trunk cover does not fit.

After I modify the cover. It looks better

The kit did not include the joint of the front trunk. So I scratch built one.
 |
| Limited24 |
Posted - 10/17/2011 : 10:20:43
Yes! I modified this Steering wheel.

Interior was done.

Front suspension almost done.

Engine bay almost done.

What amazing Bosica wheel!
 |
| Limited24 |
Posted - 10/14/2011 : 07:27:47
I use the BOSICA wheel trans kit, but the offset is not the same. So I have to fix that problem.

Scratch built the hub.

Solder the hub on rear suspension.

I use 0.1mm copper wire to make the break hose.
 |
| Limited24 |
Posted - 10/10/2011 : 21:17:24
Thank you everybody! I will keep update asap.
Oringinal tie rod is a photoetch. So I scratch built 2 tie rods.

Setup the tie rod on rear suspension. It looks good.
 |
| Models123 |
Posted - 10/10/2011 : 07:17:11
Very impressive! I'm really looking forward to seeing more photos.
Marshall |
| the.x.man |
Posted - 10/09/2011 : 17:54:24
I am going to enjoy this :o)
________________________________________________________
The only substitute for cubic inches is more cubic inches!
~ Max Balchowsky |