| Author |
 Topic Topic  |
|
Ferrarinut
USA
1489 Posts |
 Posted - 12/12/2011 : 11:11:44 Posted - 12/12/2011 : 11:11:44


|
The bodies do look glossy now the varnish has been sprayed.
 |
 |
|
|
Ferrarinut
USA
1489 Posts |
Posted - 12/12/2011 : 11:13:11
|
The bodies will spend an hour in the oven, after this we�ll let the paint dry and harden for a few days before polishing. In the meantime the interior parts have to be prepared and painted. This will be our next meeting.
 |
|
|
|
PeterW
USA
1216 Posts |
Posted - 12/12/2011 : 11:23:43

|
quote:
Originally posted by Ferrarinut
New photos and comments just received from Jean-Paul! Enjoy.
The bodies have been sanded now, the last thing before painting is the characteristic skirt at the bottom of the rear part. The photo-etched part has to be bent, and then glued at his place. First time it has been so realistically reproduced in 1/43 scale, I think.

The skirt is a welcome detail on this model. You can see some great detail photos in the attached link...lot's of rear end photos so you can see it clearly. Mike Craig did a super job on these kits!
http://www.supercars.net/gallery/119513/2697/4.html |
|
|
|
Ferrarinut
USA
1489 Posts |
Posted - 12/19/2011 : 19:34:05
|
The chassis have received the primer coat of paint, after some touch-up with files and sanding paper, we�ll give them the black coat.
 |
|
|
|
Ferrarinut
USA
1489 Posts |
Posted - 12/19/2011 : 19:35:11
|
Exhaust pipes, dash boards and central parts of the cockpit on the painting stands.
 |
|
|
|
Ferrarinut
USA
1489 Posts |
Posted - 12/19/2011 : 19:36:11
|
Seats and cockpits.
 |
|
|
|
Ferrarinut
USA
1489 Posts |
Posted - 12/19/2011 : 19:37:22
|
Wheels and photo-etched inner doors.
 |
|
|
|
Ferrarinut
USA
1489 Posts |
Posted - 12/19/2011 : 19:43:19
|
All parts painted now, the silver ones will receive a slight coat of very diluted black paint. This will darken the paint and give them a more realistic look, less �shiny � and more suitable for racing GTOs of the sixties.
 |
|
|
|
Ferrarinut
USA
1489 Posts |
Posted - 12/19/2011 : 19:45:01
|
Back to the bodies. After a careful sanding with very fine wet sanding paper to remove the last flaws in the paint, a good polish should give us the desired aspect. Bodies will be ready now for the next steps of the building. See you in a few days.
 |
|
|
|
Ferrarinut
USA
1489 Posts |
Posted - 12/22/2011 : 15:49:34
|
Painting of the windscreen surround, radiator grill, main lights location, front and side air vents.
 |
|
|
|
Ferrarinut
USA
1489 Posts |
Posted - 12/22/2011 : 15:50:40
|
Dashboard assembly and painting of the seats.
 |
|
|
|
Ferrarinut
USA
1489 Posts |
Posted - 12/22/2011 : 15:52:05
|
Each part of the vac-form is cut separetely for the best fit, 2 parts for the door to reproduce the sliding effect.
 |
|
|
|
Ferrarinut
USA
1489 Posts |
Posted - 12/22/2011 : 15:53:53
|
We can now apply the decals, each motif is cut as precisely as possible to remove the varnish surround.
 |
|
|
|
Ferrarinut
USA
1489 Posts |
Posted - 12/22/2011 : 15:55:18
|
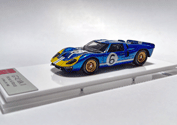
Here are the 3 available versions in the kit.

 |
|
|
|
Ferrarinut
USA
1489 Posts |
Posted - 12/22/2011 : 15:57:22
|
The dashboard has been glued to the body and the interior will be completed when all the parts find their right place. Please note the really nice photo-etched grid for the gear lever, which I did forget on the photograph; but be assured it will be on the model!
 |
|
|
|
Topic |
|