| Author |
 Topic Topic  |
|
Ferrarinut
USA
1489 Posts |
 Posted - 05/31/2012 : 09:42:21 Posted - 05/31/2012 : 09:42:21

|
All window parts are cut separately to get the best possible fit. Due to the roof's lowering, the side windows are different from the other GTOs with only a small opening. First step is to mark the shape with a pen, then cut the opening and at last put the 2 rails and the trapdoor.
 |
 |
|
|
Ferrarinut
USA
1489 Posts |
Posted - 05/31/2012 : 09:42:58
|
All windows on the body now.
 |
|
|
|
Ferrarinut
USA
1489 Posts |
Posted - 06/04/2012 : 09:39:16
|
In a prior thread, 2 of our faithful forum members had some comments about the steering wheels. After careful examination of the real thing you can see on the photograph, here is the answer.
 |
|
|
|
Ferrarinut
USA
1489 Posts |
Posted - 06/04/2012 : 09:41:44
|
The main steps for the steering wheel with first the bending of the wheel arms to right angle, then we'll glue the circle and paint the rim, and at last reproduce the black strip on one side and the notches on the other side. And even if it's a little difficult to see on the photographs, the rim is well rounded. Hope our friends will appreciate! You can also see the nice fuses box, instruments panel and switches, all provided in the kit and well proportioned.
 |
|
|
|
Ferrarinut
USA
1489 Posts |
Posted - 06/04/2012 : 09:45:13
|
Main interior parts after slight weathering and painting of the seats. Also the really nice photo-etched gear lever grille and the essential rear view mirror.
 |
|
|
|
Ferrarinut
USA
1489 Posts |
Posted - 06/04/2012 : 09:45:58
|
Final assembly of the wheels.
 |
|
|
|
Ferrarinut
USA
1489 Posts |
Posted - 06/04/2012 : 09:50:02
|
Each decal is carefully cut one by one to eliminate the varnish surround. The black stripes are provided for the windscreen's sun shade ( ? ) and surrounds, as it was roughly secured with tape on the real car.
 |
|
|
|
Ferrarinut
USA
1489 Posts |
Posted - 06/04/2012 : 09:51:17
|
After having glued the 3 front air intake covers and the central part for the hood where necessary, and of course the rear view mirror; we can now apply the decals.
 |
|
|
|
PeterW
USA
1216 Posts |
Posted - 06/04/2012 : 11:44:40

|
quote:
Originally posted by Ferrarinut
The main steps for the steering wheel with first the bending of the wheel arms to right angle, then we'll glue the circle and paint the rim, and at last reproduce the black strip on one side and the notches on the other side. And even if it's a little difficult to see on the photographs, the rim is well rounded. Hope our friends will appreciate! You can also see the nice fuses box, instruments panel and switches, all provided in the kit and well proportioned.
Well Done! |
|
|
|
Ferrarinut
USA
1489 Posts |
Posted - 06/05/2012 : 10:08:31
|
| I would like to add that I will be deleting most of the previous comments soon. This is not fair to Jean-Paul who has been providing his photos and comments for his current build process. I will probably be slammed in David's blog for deleting the comments. Oh well. |
|
|
|
the.x.man
New Zealand
877 Posts |
Posted - 06/06/2012 : 17:01:15
|
I am extremely sorry, but I do not like the way this thread has devolved - so my apologies to everybody: I am locking this topic and cleaning out some of the unsavory comments that have appeared.
David, ordinarily you would be most welcome to pass on your opinions here, but somehow you are managing to do so in a manner that is causing impolite behavior from not just yourself, but others too. Contrary to your latest blog entry, I am not going to ban you from here. However, in all fairness to Jean-Paul, I am going to remove a lot of your comments from this topic (along with a few others), and lock it for the time being. When Mike has further progress from Jean-Paul to show us, he will unlock this topic and update it. Hopefully by then, people will have cooled down a little and this topic can be left open for comment again. If you do continue to use the MiniWerks forum for what appears to be personal vendetta against a number of highly respected world class model builders, then make no mistake, you will be banned.
Paolo, I also apologise, but I will be removing a couple of your comments too, as they tie in directly with the mess I am attempting to clean up.
My apologies to any other participants whose comments I have edited, but I feel it is necessary in order to keep this forum the way it is supposed to be.
Finally, to everybody here: you are all still most welcome to pass comment, or even criticism (in any topic), but please try to do so in manner that does not cause offense - and do not make it personal! Remember too, not everyone here has English as their first language, so please choose your words carefully when you wish to pass a critical comment.
________________________________________________________
The only substitute for cubic inches is more cubic inches!
~ Max Balchowsky |
|
|
|
Ferrarinut
USA
1489 Posts |
Posted - 06/08/2012 : 10:06:26
|
With the aim to gain some precious seconds during refueling, David Piper and his team did create an ingenious system which allowed the driver to open the filler cap in the pits alley, with some catgut from the cap to the rear window and up to the interior mirror. We'll use some very thin wire and the nice phot-etched item of the 2 parts cap, to reproduce the system. Best not to drink too much coffee before! You can also see at this stage that the main part of the cockpit and the dashboard have been glued to the body.
 |
|
|
|
Ferrarinut
USA
1489 Posts |
Posted - 06/08/2012 : 10:07:26
|
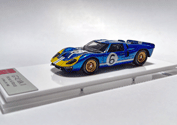
The cars are closed now and did receive their wheels.
 |
|
|
|
Ferrarinut
USA
1489 Posts |
Posted - 06/08/2012 : 10:16:00
|
 |
|
|
|
Ferrarinut
USA
1489 Posts |
Posted - 06/08/2012 : 10:18:56
|
The cars will be completed when all these parts find their place on the bodies. I'll let you guess which is going where. The answer in a few days!
 |
|
|
|
Topic |
|