| Author |
 Topic Topic  |
|
PeterW
USA
1216 Posts |
 Posted - 07/02/2012 : 11:17:52 Posted - 07/02/2012 : 11:17:52


|
I have decided to revise my original plans and do a very limited number with upgrades to create a high detail curbside version instead of box stock . These will include machined headlights and indicators, taillights, operable fuel filler and steering column assembly. In addition I will add Bosica wheels with machined brakes and valve stems. Watch here as I show how I create these versions. Contact Mike if interested.
Two versions will be made, the Pebble Beach 2011 "Most Elegant" and Daytona "Al Hodges Affair"


 |
Edited by - PeterW on 07/02/2012 11:25:08 |
|
|
PeterW
USA
1216 Posts |
Posted - 07/03/2012 : 09:08:04
|
My first observations after looking at detailed reference photos of the car are that some minor changes to the body details will be required.
Many thanks to Michael Gregg for the great detail photos!
 Photo Copyright Michael Gregg 2011 Photo Copyright Michael Gregg 2011
The rear wing and rear vents as noted in black marker as well as removal of the roof joint. Also note the flare on the wheel wells...this detail will be added.

The curve of the rear wing will be changed...it should extend further to the edges with less "arch".

Here is a nice detail photo of the rear of the car at Pebble Beach:
http://www.flickr.com/photos/ikeya/6081854937/sizes/l/in/photostream/
Note the small perforations under the vent covers on the rear glass...this will be a great detail to replicate!
 Photo Copyright Michael Gregg 2011 Photo Copyright Michael Gregg 2011
The rear valence will be straitened a little bit with less curve at the ends.

 Photo Copyright Michael Gregg 2011 Photo Copyright Michael Gregg 2011
Here a comparison of the Esprit43 on the left and an AMR Nostalgia One on the right.

The nose on the Daytona car will be modified slightly, The bottom edge is strait and the lower vents are filled per the instruction sheet. A new grill will need to be fabricated to work in the new opening.

It should also be noted that the "flattened" lower portion is the result of a piece of sheet metal that was inserted into the opening and then folded down to cover the 3 vents underneath. This photo shows it clearly:
 Photo copyright Michael Gregg 2011 Photo copyright Michael Gregg 2011
And as it turns out the rear vent is a little deceptive...it is painted black and white. The black appears to be a void...but it's not.
 Photo Copyright Michael Gregg 2011 Photo Copyright Michael Gregg 2011
The side light was removed and a hole was left behind...apparently no time to worry about replacing it. The two driving lights are different.
 Photo Copyright Michael Gregg 2011 Photo Copyright Michael Gregg 2011 |
Edited by - PeterW on 07/04/2012 10:47:30 |
 |
|
|
PeterW
USA
1216 Posts |
Posted - 08/18/2012 : 17:07:05
|
The body modifications are complete and primers have been applied. The window frames will be exposed and polished so a scribed "reveal" has been created to define them better.All of the panel lines have been deepened, the top of the door edge trim removed and smoothed [no trim existed] which also helps make the side windows appear a little taller as they do on the real car.The side vents have been thinned, rear spoiler modified along with the rear end of the car and the roof joint has been filled.


The primers will now be wet sanded with very fine sandpaper [body in foreground]. Color coat and decal work is next as well as the interior preparation.
Come back soon as this project will finish off rapidly. |
Edited by - PeterW on 08/18/2012 17:11:03 |
|
|
|
PeterW
USA
1216 Posts |
Posted - 08/20/2012 : 09:56:58
|
The color coats are now on and window frames all polished. On to the decal work.
Three of these are sold. I have one version available for purchase...R1 Daytona 24 Hours 1966 Car #30. Contact Mike to reserve.
 |
Edited by - PeterW on 08/20/2012 09:57:25 |
|
|
|
PeterW
USA
1216 Posts |
Posted - 08/20/2012 : 17:11:19
|
The initial decal work is complete. Once they are fully dry some minor touch up and the panel lines will be attended to. The D Flaps will be painted and put in place during final assembly for a more realistic appearance.
 |
|
|
|
PeterW
USA
1216 Posts |
Posted - 08/28/2012 : 17:44:12
|
The decals have been touched up and panel lines cut razor thin and tucked into their respective joints.
Clear coat has now been applied and will need to cure and then the glass installed and on to final assembly. I will show highlights of the interior before it all comes together.
I wasn't entirely happy with the first set of photos so here are some new ones:


 |
Edited by - PeterW on 08/29/2012 10:51:19 |
|
|
|
MikhailZ
Ukraine
17 Posts |
Posted - 08/29/2012 : 03:05:37
|
| regarding � 32 Why COCOA.FLR.??? COCOA.FLA.!!! |
|
|
|
David
109 Posts |
Posted - 08/29/2012 : 04:27:08
|
| Not 100% sure about FLA/FLR. |
|
|
|
PeterW
USA
1216 Posts |
Posted - 08/29/2012 : 08:43:00
|
Well let's see...it's almost impossible to tell from the photos so I made the correction to "COCOA" but whether or not it's FLR or FLA, neither would be correct and at this point is not important. It should be "FL" to be correct.
|
Edited by - PeterW on 08/29/2012 12:42:05 |
|
|
|
ramapao69
Italy
512 Posts |
Posted - 09/09/2012 : 07:19:00
|
| No more news here?? ;-)) |
|
|
|
PeterW
USA
1216 Posts |
Posted - 09/09/2012 : 18:59:57
|
quote:
Originally posted by ramapao69
No more news here?? ;-))
Thanks for asking...Monday night I will post many photos. Been busy getting all of the details worked out...including drilling the rear window vents, machining the headlights and tail lights, fuel filler, etc.
Peter W |
|
|
|
PeterW
USA
1216 Posts |
Posted - 09/10/2012 : 10:28:32
|
Interior detail parts include the textured dash with separate vents, steering wheel assembly, gear shifter, dip switch, mirror and switches. Also shown are the machined headlight replacements and the frames as well as the machined brakes.

The glass is installed on the front and rear with the rear glass enhanced with hand drilled vents [as opposed to the decals supplied with the kits].

Interior is painted a hammered titanium gold, seats blue and the Bosica wheels are painted and assembled. They will get their valve stems once the model is mounted to the base.

The seat frames will be painted aluminum and the oil filler tube detailed prior to final fitting.
Machined headlights...

...and fuel filler. Note the perforations in the vac form rear glass.
 |
Edited by - PeterW on 09/10/2012 16:14:36 |
|
|
|
PeterW
USA
1216 Posts |
Posted - 09/11/2012 : 13:19:06
|
Interiors are now completed.


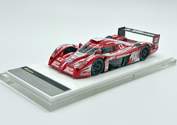
And they are joined up with their bodies and checked for fit on their respective bases.
The Daytona car on the lower right is available for purchase.
 |
Edited by - PeterW on 09/11/2012 16:11:25 |
|
|
|
PeterW
USA
1216 Posts |
Posted - 09/12/2012 : 09:45:18
|
Copper sheet in the process of being formed on the bottom of the nose to replicate the sheet metal [lower D vent] cover used on the Daytona car.
 |
|
|
|
PeterW
USA
1216 Posts |
Posted - 09/12/2012 : 17:17:41
|
| SOLD OUT |
|
|
|
glengorse
United Kingdom
230 Posts |
Posted - 09/13/2012 : 00:48:17
|
Well done Peter, an excellent set of GTO's and so well detailed. Attention to detail as ever.... excellent |
|
|
|
Topic |
|